A helpful Monday blog post for those of you with a little more time on your hands than usual. Have you ever thought, I wish my photographs were more organized? This post is for you! I’m sure there are many ways of organizing but this is what works for me and I thought I would share with the hope of it helping you to be able to have your memories organized. You could even make it a fun task to include the kids in doing.
Step 1. Make a list of all of the locations you can think of. This would look different for everyone but the list below might get you off to a start-
- Phone(s)
- Online backups such as icloud, google photos and dropbox
- Computers or harddrives
- Memory cards from cameras
- USB thumbdrives or cd/dvds
- Prints
Once you have your list written, think of what organization system would be best for you. I recommend ordering by date, so that is what I am going to be talking about in this post but if you think you would be better sorting by subject- Travel/ Family/ friends etc, what I have written below could still be applied.
Step 2. Make a folder to save all of your photographs to. I recommend doing this on a computer with a fair amount of space available on it. (I just checked my folder and it has 892gb of personal photos!) Next, make sub-folders for each year, you may then want to make sub-folders inside those to order by month.
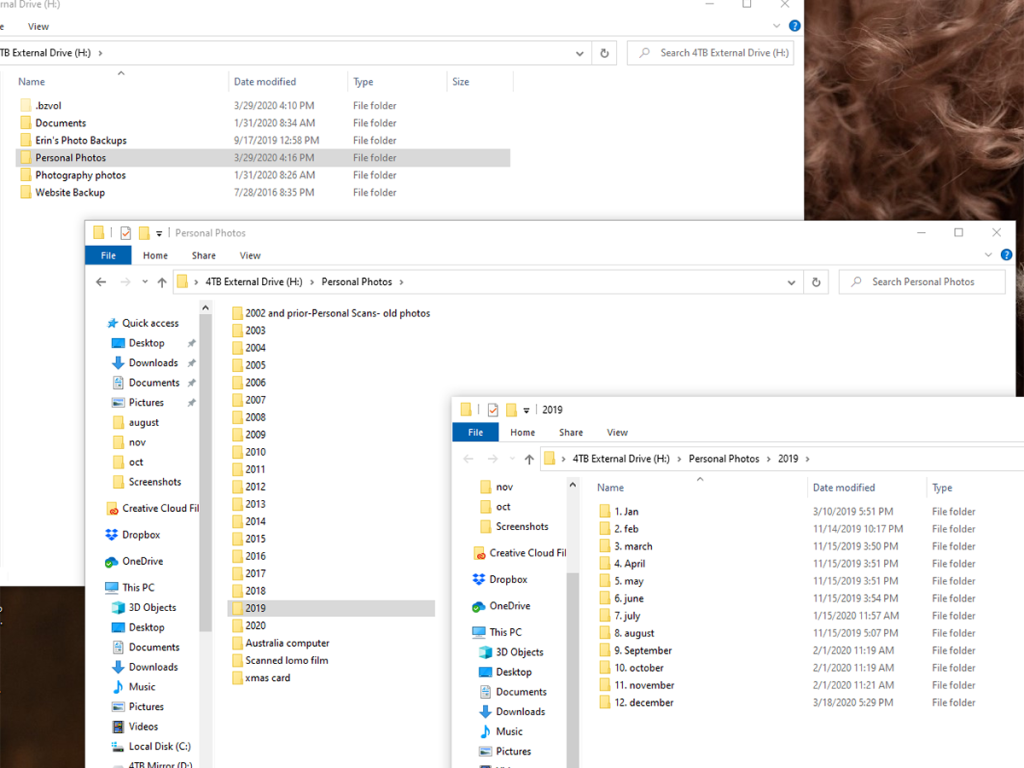
Step 3. Start gathering from all of the places you had written on your list of photo locations. As you go, order by date the photograph was taken- you can usually find this in the properties of the photograph, or by hovering your cursor over the thumbnail of the photograph. You may also like to change the image file name to the subject, or create another sub-folder inside of the month folder- for example, ‘Nora’s 1st Birthday’ then gather all of the images together for that event inside of it. This step is certainly easier said than done, it might take you awhile to gather all of the photographs and sort them depending on how many photographs you take. The item that took the longest for me was prints, scanning everything that was prior to digital can take a long time, but it is certainly worth it to be able to share these memories with friends and family and have peace of mind that they are digitized should anything happen to the originals. Just be sure to scan them in a high enough quality to be able to make prints from in the future- the file size should be at least 2mb. This could be a task for older kids to take part in who might be sitting playing a game etc that they could stop and put more photographs on to scan. Otherwise there are businesses such as Legacy box who will take your photos/video and turn to digital.
Step 4. Backup- once you have all of your photographs organized it is very important to make sure all of your hard work never gets lost. I recommend-
- One local copy- on your computer.
- One external backup- on an external harddrive.
- One online copy- google photos allow up to 100gb of space for $27.99 a year, or if you have amazon prime, they have unlimited photo uploads included in the prime membership (for personal use not for business).
Once you have gathered and sorted all of your photographs, you will have peace of mind that all of your families memories will be saved and easily accessed, and it will be fun to share memories with loved ones! Continue adding to your folder with new photographs and the sooner you do this the better as there will be less to have to sort later on!
Any questions? Any other topics like this that might be helpful for me to write about? Send me an email- erin@woodgatephotography.com.